Using the information found in your PSQ Cleaning schedules answer the following questions and complete the activity.
Give a brief definition of the terms:
a) Cleaning- the act of making something clean; To rid of dirt, rubbish, or impurities; to dispose/get rid of mess within a place. Cleanliness is the absence of dirt, including dust, stains and bad smells. In more recent times, since the germ theory of disease, it has also come to mean an absence of germs and other hazardous materials. It can apply to humans, animals, clothing, eating utensils, plates, pans, cups, etc., food, other movable objects, floors, windows, walls, toilets, etc.
b) Sanitising- 1. To make hygienic or sanitary. 2. To make less controversial or more acceptable by removing potentially offensive elements, aspects, connotations, etc. 3. To make sanitary, as by cleaning or disinfecting.
Using the information obtained on the PSQ 26 Daily production check list identify 4 daily cleaning tasks and 4 weekly cleaning tasks.
4 Daily Cleaning Tasks
Floors- Brush, scrape and mop
Mixer (Bowl)- using clean cloth, scrape down, wash with detergent.
Proover-Remove scrap dough, brush out or mop.
Knock Out Table (Work Benches)-Brush down, remove scrap dough, wash with detergent.
4 Weekly Cleaning Tasks
Walls and Ceilings
Oven Interior
Cash Registers and Telephone
Production Windows and Door
Briefly explain the importance of maintaining house keeping standards in the work place and how this impacts on the business.
The importance of maintaining house keeping standards in the workplace is keeping your workplace clean means having a systematic and thorough approach to keeping work and storage areas clean, sanitised and free from garbage and pests. It also means following hygienic practices for handling equipment and disposing of waste or garbage. All of this is necessary to prevent or minimise the risk of cross-contamination of harmful bacteria or even disease. This would pose significant safety hazards for customers and staff.
As a bakery is a food industry keeping a clean workplace allows for food quality. Food quality is the quality characteristics of food that is acceptable to consumers. This includes external factors as appearance (size, shape, color, gloss, and consistency), texture, and flavor.
Food quality is an important food manufacturing requirement, because food consumers are susceptible to any form of contamination that may occur during the manufacturing process. Many consumers also rely on manufacturing and processing standards, particularly to know what ingredients are present, due to dietary, nutritional requirements or medical conditions.
Besides ingredient quality, there are also sanitation requirements. This is important to ensure the food processing environment is as clean as possible in order to produce the safest possible food for the consumer. Simply the bakery must be in good hygiene in order for the product to also be hygienic.
A workplace is made hygienic by clean equipment and work areas, Regular and safe removal of rubbish, No pests such as flies, cockroaches, mice and rats. It is important to keep the workplace hygienic as Dirt, pests and old food carry food poisoning micro-organisms. As well as the workplace being hygienic the workers within the workplace must also have personal hygiene. Maintaining personal hygiene in the workplace is all about your personal presentation and cleanliness, your clothing and footwear, and what to do if you are ill or have a health condition. All these aspects of personal hygiene impact on the quality and safety of the food and service you provide to your customers. Poor personal hygiene can also affect the health of your work colleagues. So there are many important reasons why personal hygiene standards must be in place and followed by all staff.
Having a clean and hygienic workplace impacts on the business, by showing customers that a business takes care of its product and surroundings, being the workplace itself and the customers. An unhygienic workplace may result in the closing down of the store, by the health department.
Therefore it is important to uphold house keeping standards within the workplace in order to maintain a clean and hygienic work environment and to ensure the on going operation of the business.
PSQ 26 Daily Production Check List Sheets
PSQ sheets used in the bakery are basically a check list of a cleaning schedule on which is to be carried out day to day.
The PSQ sheets shows, A list of cleaning jobs which have to be done in the bakery daily, weekly or monthly, What has to be cleaned and When it has to be cleaned. The advantage of using PSQ sheets determines that everything within the bakery gets cleaned. The cleaning practices used within the bakery are:
To remove and destroy harmful micro-organisms:
Scrape - to remove large particles of dirt,dust, flour and dough
Rinse - to remove sticky dough, Wash and scrub - in hot water with detergent to remove dirt and grease
Sanitise - to kill germs
Air dry - to remove water. Germs need water to grow. If you use a tea towel it must be clean and use only once.
Cleaning is carried up using detergents and sanitisers.
Detergents
Will remove dirt and grease
Will work well in clean water which is changed regularly
Will not work well if the water is dirty
Will not kill micro-organisms.
Sanitisers
Will usually take some time to kill micro-organisms properly
Will kill most harmful micro-organisms if used according to the manufacturer’s instructions
Will not usually remove dirt
Will not work well on dirty surfaces.
Identify who is responsible for signing PSQ Sheets.
Explain how the responsibilities for cleaning and signing are allocated.
The Bakers fill in the front of the sheet at the end of each day, the person who signs that an item is cleaned is responsible for the cleaning of that item/machinery etc. Cleaning of machinery by the bakers is basically performed at random, on some acceptations, the person running the oven for that day’s production will keep the cleanliness of the oven, the person running the bowl will keep the tidiness of the bowl. The last baker to leave checks over the list and completes the front of the PSQ sheet, he then signs and dates the sheet in the bottom left hand corner. The closing staff, by then being the counter staff, fills in the back of the sheet as they progress through the afternoons cleaning schedule until close. As with the bakers the closing staff sign off and tick off each schedule. They go over the PSQ sheet and check nothing has been missed and not cleaned, after it is checked the sheet is signed and Dated and is completed for that day.
Tuesday, September 11, 2007
Monday, September 10, 2007
4/3 Unacceptable Products
When removing a baked product from the oven state two(2) situations that would not allow you to place the baked product out for sale.
For example: Rolls touch the side of the oven and tear away the crust. If this occurred it would be necessary to remove the effect rolls and discard before
placing the others out for sale.
The aim of baking and of the baker is to produce bread with even colour, shape and appearance in accordance to the recipe book and in accordance of hygiene principles. Basically stating that the customer is purchasing a quality and un-tampered with, bakers delight product. Two situations that would not allow a product to be placed out the front of the bakery in order to be sold from the causes of removing a product from the oven are Firstly If the product has been Over Baked (Left in the oven for an extensive period of time) or Under baked (Removed from the oven before the product was properly baked) and Secondly if the Product is dropped onto the floor whilst being removed from the oven.
Under Baked and Over Baked Products
A baked product is typically a food product that has been exposed to heat (heat from the oven) in order to bake the product from the outside. The baked product is not considered to be finished baking (i.e., done) until its interior is baked. The ability to detect when an item is completely and optimally baked is of great importance in the baking industry in order to place quality product out for it to be sold. When a bread product for example is completely baked, the gluten in the flour is transformed and the starches contained in the product are gelatinized. The correct conditions of temperature and time for which a product is baked for determines the doughs expansion with the oven and the appearance of the crusts colour and texture.
Over baked bread has a dark, thick crust, it may have a reduced volume, its firm and stales fast. If the oven temperature is too high the crust sets faster, before the dough has finished expanding, producing a torn crust texture similar to under proved doughs. Leaving a product within an oven for longer than its needed baking time also causes over baked products. For example, the oven has signalled the baking for a product is completed and the ovens operator has failed to notice the oven and so the product remains within the oven still baking for longer than it was needed to be baked for. Or the ovens temperature was set greater than what was needed.
Under baked bread, may be pale, or the crust may be baked although the loaf centre remains doughy. A pale crust may be caused by low oven temperatures, uneven heat distribution/uneven baking within the oven or the product being removed from the oven before the product was baked. Oven temperatures that are too low produce bread with an over larger volume with a coarse texture and thick pale crust. Loaves have some signs of being over-proved because the dough continues to rise for too long while in the oven. For example, the crust on fruit dough products with the oven may appear to be baked but the centre of the products are still doughy, the apple within a fruit log may not have been thoroughly baked, and the inside of the product may be very pale and unstable when handled.
Overall to ensure over-baked and under-baked products are not placed onto the shelves to be sold correct oven operation is needed in accordance with the oven temperatures and baking times for products, and so products must be removed from the oven at correct times.
Product Being Dropped Onto Floor/ Mishandling Products
It is a known fact in food industry businesses that when a product is dropped onto the ground/floor the product is deemed contaminated and is no longer allowed to be sold to customers. Simply the usage of product which has been dropped onto the floor is unhygienic. Hygiene can be defined as Conditions and practices that serve to promote or preserve health: hygiene in the workplace; personal hygiene.
Under the “Regulations Under the Food And Drug Act 1908-1976” pertaining specifically to hygiene and food handling the act covers sanction of the proper storage and handling of products baked in order to control the quality of the product for the health of its purchaser. Simply meaning that the customer is receiving a diseased and uncontaminated baker’s delight product. The act states that any articles of food subjected or exposed to contamination by product being dropped onto the floor, shall be deemed to be unwholesome and unfit for human consumption. Product may have been dropped onto the floor for example, when the product is being removed from the oven it is knocked out of the tin or slid off the tray onto the bench and has fallen from the bench onto the floor. This can be said to be the mishandling products. Other forms of mishandling baked products are, counter staff stacking warm products straight form the oven causing the product to collapse/squish onto itself or placing products with cheese straight from the oven over non-cheesed products causing the still unset melted cheese to fall onto the un-cheesed product.
Overall to ensure that product is not dropped onto the floor when being removed from the oven, the ovens operator needs space to work, proper safety measure i.e. oven mitts, apron. And to work carefully in order not to damage or contaminated to the product in order for the product to be sales worthy, and to ensure the customer is receiving a fine Bakers Delight Goods.
Sunday, September 9, 2007
4/2 Finishing Requirements
Task: Using your recipe book identify 3 products that have different finishing requirements i.e. fondant. For each of these products state what is required and how the finishing medium is applied. If weights are stated in your recipe book include these.
The Three products identified and pictured below are Finger Buns, Boston Bun and Apple and Custard Teatime. (Please Note: Apple and Custard teatime by the recipe book are prepared using fruit dough but in our bakery’s case it is made using sweet white dough, the weights have been allocated in accordance to the sweet white dough method).
Many of the products that bakers produce are "oven finished" which means that they are ready for sale as soon as they leave the oven. Other products may require finishing.
Once a product is produced it is important to ensure the customer receives a quality product. Therefore baking and icing products are essential in appearance and quality.
When appropriate ensure products coming out of the oven go directly into the shop front and are merchandised accordingly to reflect that the bakery is open for business. This will minimize double handling of products during merchandising and will enable products to be properly presented when the first customers arrive. As stated above some products may require finishing after baking, in the form of icing. Attention to detail when glazing and icing the fruit and crystal (sweet dough) products is essential to keeping the bakery looking vibrant and full of colour and to encourage customers to purchase the product. Simply stated “If it looks good, It tastes good”.
Glazing
When glazing products the whole product must be glazed soon after it comes out of the oven with special attention paid to the edges of the tray. This helps seal in freshness and extends the shelf life. Using a wide brush can speed up the time it takes to glaze a tray of product by more quickly applying the correct amount of bun wash, thus making the process more productive.
Icing
Icing
Icing should not begin onto a product until the product has cooled from being in the oven. Otherwise the icing with melt and run/slide of the product causing a dissatisfied final appearance. Having the icing at the right consistency during application and afterwards when being displayed and consumed is very important. This will allow you to correctly apply the fondant or boston icing to delicate products and not have to product squashed.
The best temperature to store and use fondant is between 28 and 32 degrees Celsius. The sides of the fondant and boston storage tubs should be scrapped down immediately after icing has been applied and the lid sealed firmly to ensure the icing mixtures stays moist for the next day.
Below are three products icing and baking details and pictures.
Finger Buns
Dough Type: Sweet White
Scaling Weight: 2.4kg or (0.80g roll)
Intermediate Proving: 20 minutes minimum
1st Moulding Technique: Rounding under Machine.
Rest Time: 10mins covered to avoid skinning
2nd Moulding Technique: Sticks, through Moulding machine to get length 15cm per roll.
Tray up Instructions: perforated tray with silicon paper (7 x 4) horizontally.
Proving Temp: 35-38 degrees Celsius. Prover Humidity: 80-85 Degrees.
Proving Time: 30minutes
Baking Temp and Time: 200 degrees at 15 mins.
Post Baking Instructions: Glaze immediately with 2g of bun wash, then allow to cool and finish accordingly to icing instructions.
Finished Specifications:
Baked Weight: 65g
Iced Weight: 85g
Height: 5cm
Width: 6cm
Length: 16cm
Icing Instructions: Ice the top along the full length of the bun with any of the following topping: 20g of Pink/White Fondant topped with non pareils or coconut, 20g of Boston icing topped with 5g of coconut or non pareils. Iced using a piping bag for Boston, or a small clean scrapper/spatula for fondant.
Apple and Custard Teatime
Dough: Sweet White
Scaling Weight: 400g dough piece
Intermediate Proving: 20 minutes minimum.
1st Moulding Technique: teatimes and twisted delights
15cm (long) x 25cm (wide) x 5cm (High)
Filling Instructions:
Sweet White dough 100%
Apple (Diced) 25%
Custard 25-50% (until smeared appropriately.)
2nd Moulding: Teatime (Cut using scissors)
Tray Up Instructions: 5 Per Tray 2 x 1 x 2 horizontally on Perforated Tray with silicon paper.
Proving Temp: 35-38 degrees Celsius. Prover Humidity: 80-85 Degrees.
Proving Time: 30 mins.
Baking Temp and Time: 200 degrees at 22 mins.
Post Baking Instructions: Glaze immediately with 2g of bun wash, then allow to cool and finish accordingly to icing/Decoration instructions.
Finished Specifications:
Baked Weight: 426g
Iced weight (Dusted): 428g
Iced Weight(Boston): 586g Iced Weight(Boston/Coconut): 631g
Width: 14cm
Length: 28cm
Decoration/Icing Instructions: 2g of icing sugar evenly dusted using a sieve, 20g of Boston piped along cuts (8 pipe lines) and topped with 5(x8) g of coconut. See Pictures below for further information. (Please note the teatime below was note iced using the recipe books recipe).
Boston Bun
Dough Type: White Fruit Dough
Scaling Weight: 400g dough piece
Intermediate Proving: 20 mins minimum.
Moulding: Moulding Technique: Cobs (14cm in diameter)
Tray up Instructions: Perforated tray with silicon paper (2 x 3) horizontally placed.
Proving Temp: 35-38 degrees Celsius. Prover Humidity: 80-85 Degrees.
Proving Time: 40 mins.
Baking Temp and Time: 200 degrees at 20 mins.
Post Baking Instructions: Glaze immediately with 2g of bun wash, then allow to cool and finish accordingly to icing instructions.
Finished Specifications:
Baked weight: 340g
Iced Weight: 505g
Height: 7cm
Diameter: 20cm
Icing Instructions: 135g of boston icing with 30g of coconut to cover the top of the boston bun. See Below for pictures.
The pictures below are of the product before and after it is iced.


Thursday, September 6, 2007
4/1 Baking Parameters Work Flow
Bakers Delight Overview
The art of dough making has changed over the years. These days the dough mixing is the critical stage of the bread manufacturing process, controlling the loaf volume and keeping quality of the bread. Process times, temperature of work area largely impact upon the quality and flour of the finished product therefore it is very important to establish the correct mixing and processing parameters to produce high quality bakers delight products and breads.
The whole system must be in balance;
Ingredients Weigh Up
Water temp
Mixing
Final Dough Temp
Rest Time
Moulding
Proving
Baking
Display
To achieve the highest quality products we need to follow each step accurately, any incorrect steps result in product quality being compromised. E.g. If dough is mixed past the ideal FDT then it will impact upon the doughs intermediate proof, moulding, final proof and ultimately the final product.
Bakers Delight Edgeworth Daily Production Schedule
The most effective way of planning production is by calculating the amount of flour weight needed to produce a predetermined number of products from a specific dough weight. With this in mind the following production line was established. (Regular Schedule, May include another White Dough on Weekends for more block loaves).
1am Shop Opens. 7.00pm Shop Closes.
First Dough
70 kg White Dough
-72 White Blocks
-5 Cut of round Rolls (includes 1 cut Bap Rolls)
-1 Cut Hamburger Rolls
-1 Cut Long Rolls
-3.2 kg Cut for Pizzas
-4 x 2.4kg Cut for Savouries (Cheese and Bacon Rolls etc.)
-2 x 1.2kg Dinner rolls
-1 x 1.2 kg Table Rolls
-4 Long Sticks
-3 Small Sticks
-15 Flour Loaves
-9 Mini Blocks
-3 Mini Flours
15 Croissants, 10 Danish Lattice, 30 Danish Squares
4 Pana Viennas and 30 Pana Rolls
7kg Continental Italian Dough
-4 Viennas
-4 Cobs
-15 Hungarian Rolls
-3 Tin Pasta Duras
20kg low G.I Dough
-42 Blocks
-30 Rolls
20kg Wholemeal Dough
-48 Blocks
-2 Flours
-2 High Tin
-2 Tin Vienna
-60 Rolls
-6 Mini Blocks
6kg Scone Dough
-1 Cut Plain Scones
-2 Cut Date Scones
32kg Country Grain Dough
-56 Blocks
-2 Flours
-2 High Tin
-2 Tin Vienna
-60 Rolls
-6 Mini Blocks
12kg Wholemeal Country Grain Dough
-24 blocks
-30 Rolls
2kg Apricot Delight/ 2kg Coffee and Date
-1 Cut 3kg for Rolls
-6 Apricot Loaves/4 C and D Loaves
70kg White Dough
-96 Blocks
-4 Cut of Rolls
-2 Cut Hamburger Rolls
-1 Cut 3kg Long Rolls
-2.4 Cut Vegemite/Spinach and Feta/Chilli Scroll
-3.2kg Cut Ham and Mayo Scrolls
-5 cobs
-5 viennas
-3 Pipe Tin
-2 Farmers Loaves
-3 High tin
-3 Tin Viennas
-12 Flours
-6 Pull Aparts (0.45kg each)
14 kg Sweet White/Fruit Dough
-8 Teatimes (Custard and Apple/Caramel/Sticky Cinnamon)
-1 Cut Finger buns
-1 Apple and Custard Scroll
-6 Fruit Loaves
-6 Mini Fruit Loaves
-2 Fruit Teatimes (Jam/Berry)
-3 Cinnamon Logs
-3 Boston Buns
-1 Cut Fruit Buns
-2 Apple and Cinnamon scrolls
-1 Jam Scroll
3kg Cape Seed/ 3 Kg Soy and Linseed
-1 3kg Cut Rolls
-3 Large Loaves
-3 Mini Loaves
65kg White Dough/70 kg
-125 Block loaves/135 Block Loaves
-15 Twisted Delights
Oven Times and Temperatures (Degrees Celsius) For Products
White Dough
-Blocks 220 for 28mins
-Flours 210 at 25mins with steam
-High Tin 210 at 30mins with steam
-Tin Viennas 210 at 30mins with steam
-Cobs/Viennas/Pipe/Farmers/Sticks 210 at 18mins with steam
-Bread Rolls 210 at 18mins with steam
-Hamburger Rolls 210 at 18 mins
-Mini Block/Flours 220 at 25mins
-Twists 200 at 17-18mins with steam
-Pull Aparts 210 at 18-22mins with steam
-Scroll 210 at 18-25mins with steam
-Savouries and Pizzas 215 at 12-15mins with steam
Pana
-210 at 20mins then 200 at 10mins with Flue Damper Open. And with steam
Croissants/ Lattice/Danish Squares 200 at 12-15mins with steam
Continental/Italian
-210 at 15mins then 200 at 10-15mins with flue Damper open. And with steam
-Hungarian rolls 200 at 18mins with steam.
Low G.I
-Blocks 220 at 28mins
-Rolls 210 for 18mns with steam
Wholemeal
-Block 225 at 32 mins with steam
-Flour 210 at 25-30mins with steam
-Mini Block-210 at 25mins with steam
-Wholemeal rolls 210 at 18mins with steam
Country Grain/Wholemeal Country Grain
-Block 225 at 32 mins with steam
-Flour 210 at 25-30mins with steam
-Mini Block-210 at 25mins with steam
-Rolls 210 at 18mins with steam
Scones 200 at 18mins
Apricot/Coffee and Date
-Loaves 200 at 25-30mins with steam
-Rolls 200 at 16-17mins with steam
Sweet White/Fruit Dough
-All Fruit products 200 at 15-18mins
-Large Fruit Loaves 200 at 30mins
-Mini fruit Loaves 200 at 20mins
Cape Seed/Soy and Linseed
-Loaves 210 at 30-40mins with steam
-Rolls 200 at 16-18mins with steam
The following temperatures and times are not in accordance with the recipe book as these times were determined to meet the demands of our ovens design and process in order for Edgeworth’s bakery to achieve quality baked product.
Wednesday, September 5, 2007
4/1 Baking Parameters
Using the information in your Bakers Delight Recipe book state the required traying up procedures for the following product:
a)White Long Rolls
White longs rolls are to be trayed up on a perforated fluted tray, 5 x 3 (5 across the tray, 3 down the tray) 800 gram pieces. Refer to the first two pictures below.
b) White Plait 450gm
White Plaits are to be trayed up on a perforated tray or setter tray. 2 x2 ( 2 across the tray and 2 down the tray) and slopped to allow for proving. Refer to the 3rd and 4th Pictures below.
c) Cheese herb and Garlic Mini
Cheese Herd and garlic minis are to be trayed up on a perforated tray with silicon paper. 10 Per tray of 200 gram pieces, These are trayed 4 x 2 x 4, 4 minis across the top of the tray, two minis in the middle of the tray, and 4 along the bottom of a tray refer to a tray being horizontally. Refer to the 5th and 6th pictures below.


Long Rolls


White Plait


Cheese, Herb and Garlic Minis
Explain how the correct placement of the dough pieces onto the trays affects the finished product.
Placing a product onto a tray before it goes into the prover is the final time the product is handled (unless it is being cut, 0r an ingredient is added just before going into an oven i.e. tiger paste on tigers, and cross mix on hot cross buns) and so the way the product is placed upon the tray will affect its proving and final baked quality.
When traying up dough products it is important to tray the products by the recipe book guidelines, this is to ensure consistency with your product as the guidelines provided indicate the needed space for the products proof stage and the amount of space allocated for the product whilst baking to achieve maximum potential from the ovens heat to bake the product perfectly. A correctly trayed product (in-conjunction with it’s proved and baked times) will have a consistent shape and size and will allow for the end result to be uniformed.
The correct placement of dough pieces onto trays affects the doughs final outcome in means of its shape, symmetry and size as well as the doughs optimum proof within the prover. Once the product is into the oven correct placement of the dough pieces upon the trays allow for evenly distributed heat to allow for baking potential within the product. The placement of the dough also has a detrimental effect on the baking times of the product. And once the product has been baked and been removed from the oven correctly trayed dough pieces will be easily removed from the tray and the end resulted product with have a consistent and uniformed appearance.
For example when traying up rolls, normally white rolls are placed onto a perforated tray 6x4, corrective placement allows for the rolls to achieve a positive prove size without overlapping onto one another, and produces a consist shape and size roll. When traying up rolls or any other product for that matter with a seam, the seam must be placed facing downwards on the tray. This is to allow for the rolls to have a fined rounded crusted top.
Baking using perforated trays allow for the product to achieve optimum oven spring (lift), the heat is evenly distributed amongst the product upon the tray, as the heat penetrates through the perforation resulting in an immediate heat transfer into the rolls (product) allowing for better quality in product than to rolls (product) baked upon a solid aluminum tray. Perforated trays are very durable, and are easily removed from the oven using oven mitts, the trays work well in deck ovens and the perforation also adds more snap to the bottoms of the products crust. Simply ensuring product is baked on perforated trays, product will result in optimum consistency and uniformed product.
Therefore in conclusion by following the correct traying up procedure within the recipe book, and by using the stated tray, product will be bettered in appearance and overall quality giving maximum potential in the final steps in making dough products.
Tuesday, September 4, 2007
4/1 Standard Oven Operating Procedures
State the SOP (Standard Operating Procedures) required when loading a product in and out of the Oven.


Safe Oven Operating Procedure
Warning
The operator should never tamper with or make repairs to this appliance. All maintenance other than providing approved cleaning operations are to be carried out by trained technicians only.
The oven comes in a range of chamber configurations. The procedure for operating is as follows:
Before You Start
1.Always work in an organized and tidy manner on the oven.
2.Never ignore safety instructions. I.e. always were oven mitts when removing trays and tins from the oven. Never block or bypass safety devices.
3.Always replace the lift-out segment of oven turntable before starting oven.
4.Tray stops should be fully operational.
5.Check that all turntables are free to turn.
Operating the Oven
1.Do not fill any oven with steam prior to loading in of product.
2.Load oven correctly to avoid possible damage to oven drive devices. (Damage to the oven).
3.Do not over-steam oven as this will prolong oven heat recovery which will have a detrimental effect on the products.
4.Do not exceed 30 degrees temp. between different decks of oven.
5.Never slam oven doors open or closed as may cause damage to oven or injury to personnel.
6.Always keep turntable rotating, stop only when necessary and resume as soon as possible.
7.Do not leave flue dampers open during entire baking cycle as it can cause excessive heat loss (use flue dampers at specific times for specific times for specific product results).
Oven is either on or off.
To shut down at night set all temps. Controls to zero and power and lights off.
For example,
When loading block loaves, have deck of block loaves tinned up and lidded up on a clean oven bench, open the oven door carefully and quickly insert the tins into the oven and shut the door in order to keep heat within the oven, set times and temp. for a block loaf 220 degrees for 28 mins. (If a product was to be steamed as soon as the door is shut steaming can pressed) When unloading the oven ensure to have a cleared oven bench, and use oven mitts. Unload blocks in a careful manner in order not to damage the product and stack the blocks into an allocated rack or onto an allocated bench.
Explain why the baking parameters recommended in your Bakers Delight manual are used as a guide only.
Baking is the final key process of the process of creating block loaves. Baking for a time less than specified will result in bread which is not baked sufficiently within the centre of the loaf, or bread baked for an extended period of time than needed will result in burnt unsatisfactory product.
The baking parameters recommended in the bakers delight recipe book are only set and used as a guideline. The baking process varies from oven to oven, as each oven is not the same. The guidelines are set in order to give the baker an approximation in a close proximity of the times and temperatures to bake certain product at. As which was stated all ovens are different and so require a some what “trial and error” practical test to get the desired times and temps suited the oven within your bakery.
Product must be baked at a required amount of time to produce a saleable product. This is why the bakers delight manual allocates parameters as a guide line to enforce productivity consistency.
Below are pictures of the oven used in my bakery.


3/1 DVD
Block and Flour Loaves - Master Class DVD
Identify the 4 stages of producing a white block loaf and the time associated to each.
The 4stagesof producing a white block are 20 mins for mixing and preparation, 20 mins rest time, 50 mins proving time and finally 30 mins baking time.
Name an essential hygiene step when producing dough?
The essential hygiene step when producing a dough is simply to have clean hands.
What is the scale weight of a white block loaf?
The scale weight of a white block loaf is 800grams.
Why do we cover the dough during immediate prove?
We cover the dough to avoid the dough piece form getting a skin on top.
What is the minimum rest time for a white dough?
The minimum rest time for a white dough is 20mins.
Why do we put the dough through the moulder?
We place the dough through the moulder in order to release the gas from the dough piece to allow the piece to be moulded into shape.
If the dough is tearing during moulding what do we need to adjust?
The front roller, or also know as the side setting on the machine is to be adjusted in order to avoid the dough tearing.
After going through the moulder, the dough piece should be what length for a white block?
After going through the moulder, the dough piece should be 28cm in length.
How many pieces do you cut the dough into for a white block loaf?
To cut the dough into a white block loaf the dough piece must be cut into 4 even pieces.
What size tin do you use for a white block loaf?
A white block is to be placed into a clean 680 gram tin in preparation prior to baking.
When placing dough into the tin do not _______________ the dough.
Do not Push Down on the dough.
What is the length of the moulded dough piece for a tiger loaf?
24cm is the length of the moulded dough piece for a tiger loaf.
What is the correct way to place the tiger dough piece into the tin?
The correct way of placing a tiger dough piece into a tin is to place the dough with the seam facing downwards.
What are the prover settings for a white dough?
35 to 38 degrees in temperature and a humidity of 80 to 85 degrees are the prover settings for a white dough.
How long will white block loaf take to prove?
A block loaf will take approx. 40 to 60mins depending on the doughs resting time and the settings of the prover.
Identify the correct size of the loaf after proving for a
White loaf: With a white dough, the dough should be proved to 2cm below the top of a 680 gram tin.
Tiger loaf: With a tiger dough, the dough should be proved to 2cm above the top of a 680 gram tin.
How many grams of flour are sieved on a flour loaf?
10 grams of flour are sieved on a flour loaf.
When should you produce the tiger loaf topping?
The tiger loaf topping for the tiger dough should be produce 20mins before it is needed for the dough piece.
Why is the water temperature important in the production tiger bread topping?
The water temperature is important in the production of the tigers bread topping as the waters temp. begins the fermentation process, the desired temp. Is 25 degrees Celsius.
What is difference between the baking of a white block compared to a tiger loaf?
Block loaves are Baked to time not temperature and do not require steam, whereas tigers loaves do require steam, and has an adjustable time and temp.
What is the correct procedure for cooling product after baking?
Block loaves should not be stood up as this causes the product to collapse within itself, the correct procedure for cooling product after baking is to place the product onto wires.
Rolls Workshop – Master Class DVD
Why do we dry mix ingredients?
We dry mix ingredients in order to distribute the ingredients evenly around the bowl.
Identify 3 faults that will occur if the dough is too slack?
Poor volume, chewy texture and low oven spring are three faults that will occur if the dough is too slack.
How do we remove dough from the bowl?
We remove the dough from the bowl by using a plastic scrapper, while doing so cutting the dough into smaller pieces.
What are 2 ways to identify if a dough was under mixed?
2 ways to identify if a dough was under mixed are as a dough check temperature and perform window test, and after loaf has been baked it can be identified as under mixed by poor volume and crust appearance and texture.
Why do we not over load the boards before proving?
Boards should not be overloaded with dough before proving as the pieces may fall off the boards to the floor and be contaminated and thus are not to be used.
How should we store clean trays in the bakery and why?
We should store clean trays in an upside down manner in order to prevent pan dirt from falling onto the trays.
How many white round rolls should you place on a tray when baking?
White round rolls should be placed 4 x 6 equally a total of 24 rolls pr tray.
What are the 7 key steps to great rolls?
The seven key steps to great rolls are:
1.Weigh Ingredients
2.Water temperature 10 degrees Celsius
3.The doughs FDT (final dough temperature) to be 28 degrees.
4.The dough should be rested within the bowl for 5mins.
5.The dough to be given an intermediate proof.
6.The rolls to be baked in a hot oven to time and not by temperature.
7.Finally take care of the product when removing it from the oven and from the tray in order to have a quality fined product to sell.
Thursday, August 30, 2007
3/1 Dough Develpoment
Experimentation of Cobs at Different Mixing Points
Aim:
To observe and record temperature, texture, characteristics, and appearance results of mixing a dough at different intervals throughout the mixing process. Throughout the process removing 550grams of dough, proceed through the moulding and proving stages and the baking process of making the bread product white cobs.
Pre-Experiment Information:
Mixing has three main purposes:To combine ingredients into a uniform, smooth dough.To distribute the yeast evenly throughout the dough.To develop the gluten.When ingredients are mixed together along with flour and water, they form a dough, if a finished dough temperature is too high or too low, it can have a detrimental effect of the final quality of a product.
Method:
-Weigh up/ Construct a white dough using the recipe,
Bakers Flour- 100%
Salt-2%
Improver-1%
Yeast-2%
Vegetable Oil-1%
Water-60%
EYF= 1.66
-Begin the mixing process by starting the bowl
-After mixing has gone on for 1minute, 3minutes, 5minutes and 7minutes remove 550g of dough, and at the completion of mixing remove 55o grams of dough after the dough temperature has reached 28 degrees.
-Mould these pieces of dough and give proper intermediate proving
-Make the five pieces of dough into white cobs
-Tray cobs onto perforated tray and place into prover, when cobs are through the proving stage place cobs into oven and bake for 215 degrees for 18mins with steam.
-After baking is completed photograph the cobs together and singularly as a whole cob and photograph the cobs internally.
Results:
The pictures below represent each stage of the method from beginning to end. Temperature results are as follows,
The flour temp. was 21.2 degrees Celsius.
The water temp. used was 10 degrees Celsius.
The 550gram piece after 1min of mixings temp. was 20.3 degrees
The 550gram piece after 3mins of mixings temp. was 22.1 degrees
The 550gram piece after 5mins of mixings temp. was 24 degrees
The 550gram piece after 7mins of mixings temp. was 26.1 degrees
The 550gram piece after mixing was completed 28.1 degrees.
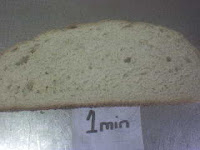
As can be seen in the pictures below the cobs improved with dough quality the longer it was spun, the first piece removed after 1minute of mixing was cold, sticky because it was still damp from the water, lumpy and full of hard flour clumps. The piece removed after 3mins of mixing was in better quality than the first piece but still cold and very inelastic. The 5min piece was beginning to see the formation of better quality dough, but yet this piece was spongy and very easily tore. The 7 min piece of 550 grams was warmer, and had some stretching ability to it. The final piece after the dough temp was 28 degrees was easily handled, had good temperature and elasticity, and was able to construct a perfect window test where as the other pieces could not.
1 minute mixed Cob
The external results for this cob was it had insufficient volume as it was too small from poor oven spring, as seen in the pictures below, the cobs top was not curved it was flat, the cob was torn and ragged, the crust colour was a pale brown compared to the cob removed at the end of mixing. The internal results for this cob were, it was still doughy (had an unbaked feel), it was hard and dense, had clumps of dough still present which resulted in its aroma still smelling doughy, had poor texture with lack of a grain and streaks. There were holes in the crumb and its crumb texture was very open and coarse. The crumb colour was a darker white compared to the completed mixed cob.
3 minute mixed Cob
Much can be said about this cob as the same with the 1 minute mixed cob except with a slight improvement within the crust character and oven spring for its external results. It crust was still not “crusty” as it was under developed; again it is still too small in volume and was pale in colour. The internal results were again an improvement, the crumb structure again was too compacted which resulted in the irregular shape and size of the cells, and still the cob was doughy and had a not so soft feel. There were holes present within the crumb which resulted with open and coarse texture. The crumb colour was still darker than the completed mixed cob (as seen below in the pictures).
5 minute mixed cob
The external results for the cob were better oven spring resulting in the better seen volume in the pictures below. The crust colour was beginning to darken up compared to the two cobs previously. The crust character was beginning to bloom, with the beginning of a shiny coat, and the improvement of shape and symmetry. The internal results for this cob were improvements with the crumb colour, and texture, the open and coarse holes were becoming less present, and the feel became softer and felt signs of better strength. The aroma scented the smell of fresh baked bread. However, there was still very small patches of crust clumps present.
7 minute mixed cob
The external results for this cob were of coarse the best of the 4 cobs removed from the bowl before reaching the dough FDT (final dough temperature), it shown better crust colour being a more golden brown, this piece was well more developed than the previous pieces. It has a sufficient oven spring and crust character. The shape has improved and now shows an even grain forming. The internal results for the 550 gram piece were the crumb colour near to perfect; not being too pale or too dark and dense, the holes within the crumb had vanished. The crumb texture showed good evenness and shape.
Completed Mixed cob
The external results for this cob were loaf were its volume (Size) was in good quality of volume, with perfect size, this cob will be easily packaged and sliced as it has normal volume aspects. This cob had a good resulting oven spring. The crust colour was lightly baked brown colour, perfectly desired colour, and shown a nice glossy type shine. The Crust Character shown that it had a perfect crust character, with shiny coat, nice soft texture with regular shape and even grain. The internal results were the crumb colour was neither pale nor dark, perfectly white. The Crumb Softness was a perfect moist centre, not to dense or tough. Perfectly baked causing no doughyness, or poor strength. The Crumb was an even thickness, perfected even grain. Regular shaped, and regular sized cells. This pieces aroma was a perfect fresh smell, not yeasty, bland, sour nor salty. As can be seen in the pictures this cob was the best of the 5 cobs produced.
Conclusion:
This experiment determined why it is important to mix a dough to the doughs desired FDT (Final Dough Temperature) in this dough it being 28 degrees. By correctly completing this procedure will result in a better quality of product.
Pictures:


Aim:
To observe and record temperature, texture, characteristics, and appearance results of mixing a dough at different intervals throughout the mixing process. Throughout the process removing 550grams of dough, proceed through the moulding and proving stages and the baking process of making the bread product white cobs.
Pre-Experiment Information:
Mixing has three main purposes:To combine ingredients into a uniform, smooth dough.To distribute the yeast evenly throughout the dough.To develop the gluten.When ingredients are mixed together along with flour and water, they form a dough, if a finished dough temperature is too high or too low, it can have a detrimental effect of the final quality of a product.
Method:
-Weigh up/ Construct a white dough using the recipe,
Bakers Flour- 100%
Salt-2%
Improver-1%
Yeast-2%
Vegetable Oil-1%
Water-60%
EYF= 1.66
-Begin the mixing process by starting the bowl
-After mixing has gone on for 1minute, 3minutes, 5minutes and 7minutes remove 550g of dough, and at the completion of mixing remove 55o grams of dough after the dough temperature has reached 28 degrees.
-Mould these pieces of dough and give proper intermediate proving
-Make the five pieces of dough into white cobs
-Tray cobs onto perforated tray and place into prover, when cobs are through the proving stage place cobs into oven and bake for 215 degrees for 18mins with steam.
-After baking is completed photograph the cobs together and singularly as a whole cob and photograph the cobs internally.
Results:
The pictures below represent each stage of the method from beginning to end. Temperature results are as follows,
The flour temp. was 21.2 degrees Celsius.
The water temp. used was 10 degrees Celsius.
The 550gram piece after 1min of mixings temp. was 20.3 degrees
The 550gram piece after 3mins of mixings temp. was 22.1 degrees
The 550gram piece after 5mins of mixings temp. was 24 degrees
The 550gram piece after 7mins of mixings temp. was 26.1 degrees
The 550gram piece after mixing was completed 28.1 degrees.
As can be seen in the pictures below the cobs improved with dough quality the longer it was spun, the first piece removed after 1minute of mixing was cold, sticky because it was still damp from the water, lumpy and full of hard flour clumps. The piece removed after 3mins of mixing was in better quality than the first piece but still cold and very inelastic. The 5min piece was beginning to see the formation of better quality dough, but yet this piece was spongy and very easily tore. The 7 min piece of 550 grams was warmer, and had some stretching ability to it. The final piece after the dough temp was 28 degrees was easily handled, had good temperature and elasticity, and was able to construct a perfect window test where as the other pieces could not.
1 minute mixed Cob
The external results for this cob was it had insufficient volume as it was too small from poor oven spring, as seen in the pictures below, the cobs top was not curved it was flat, the cob was torn and ragged, the crust colour was a pale brown compared to the cob removed at the end of mixing. The internal results for this cob were, it was still doughy (had an unbaked feel), it was hard and dense, had clumps of dough still present which resulted in its aroma still smelling doughy, had poor texture with lack of a grain and streaks. There were holes in the crumb and its crumb texture was very open and coarse. The crumb colour was a darker white compared to the completed mixed cob.
3 minute mixed Cob
Much can be said about this cob as the same with the 1 minute mixed cob except with a slight improvement within the crust character and oven spring for its external results. It crust was still not “crusty” as it was under developed; again it is still too small in volume and was pale in colour. The internal results were again an improvement, the crumb structure again was too compacted which resulted in the irregular shape and size of the cells, and still the cob was doughy and had a not so soft feel. There were holes present within the crumb which resulted with open and coarse texture. The crumb colour was still darker than the completed mixed cob (as seen below in the pictures).
5 minute mixed cob
The external results for the cob were better oven spring resulting in the better seen volume in the pictures below. The crust colour was beginning to darken up compared to the two cobs previously. The crust character was beginning to bloom, with the beginning of a shiny coat, and the improvement of shape and symmetry. The internal results for this cob were improvements with the crumb colour, and texture, the open and coarse holes were becoming less present, and the feel became softer and felt signs of better strength. The aroma scented the smell of fresh baked bread. However, there was still very small patches of crust clumps present.
7 minute mixed cob
The external results for this cob were of coarse the best of the 4 cobs removed from the bowl before reaching the dough FDT (final dough temperature), it shown better crust colour being a more golden brown, this piece was well more developed than the previous pieces. It has a sufficient oven spring and crust character. The shape has improved and now shows an even grain forming. The internal results for the 550 gram piece were the crumb colour near to perfect; not being too pale or too dark and dense, the holes within the crumb had vanished. The crumb texture showed good evenness and shape.
Completed Mixed cob
The external results for this cob were loaf were its volume (Size) was in good quality of volume, with perfect size, this cob will be easily packaged and sliced as it has normal volume aspects. This cob had a good resulting oven spring. The crust colour was lightly baked brown colour, perfectly desired colour, and shown a nice glossy type shine. The Crust Character shown that it had a perfect crust character, with shiny coat, nice soft texture with regular shape and even grain. The internal results were the crumb colour was neither pale nor dark, perfectly white. The Crumb Softness was a perfect moist centre, not to dense or tough. Perfectly baked causing no doughyness, or poor strength. The Crumb was an even thickness, perfected even grain. Regular shaped, and regular sized cells. This pieces aroma was a perfect fresh smell, not yeasty, bland, sour nor salty. As can be seen in the pictures this cob was the best of the 5 cobs produced.
Conclusion:
This experiment determined why it is important to mix a dough to the doughs desired FDT (Final Dough Temperature) in this dough it being 28 degrees. By correctly completing this procedure will result in a better quality of product.
Pictures:


Wednesday, August 29, 2007
3/2 Mixing
The Dough Matrix
Mixing a Dough By Hand
Starting with a 1kg dough
-1kg of white flour, 0.02 kg of salt, 0.01kg of improver, 0.02kg Yeast, 0.60L of water and 0.01L of oil.
Flour and ingredients were dry mixed on the bench. Yeast was added and also dried mixed into the dough. Flour was dry mixed into a somewhat doughnut shape, and water (sum) and oil were added into the middle. Working from the outside of inner circle hand mixing commenced, the flour was mixed into the water and oil and at stages the rest of the water was added. At 10mins of hand mixing the flour had began to come together into a dough. After 15-20mins of mixing by hand the doughs temperature was 24.5 degrees Celsius. After 20-25mins of continuing hand mixing the doughs temp was 26 degrees. The dough temp reached 27.1 degrees at half an hour of mixing and began to show a resembaling context of a dough which has been spun within a bowl and is at its FDT (final dough temperature). After 30-40mins the hand mixed dough was at its FDT of 28 degrees celsius. A window test was performed and so concluded mixing a dough by hand. Below are the pictures in sequence of the above description.


3/1 Mixing
In what order should the ingredients be loaded?
Make sure all ingredients are at room temperature before using, yeast being the exception as compressed yeast needs to be refrigerated. Revise through the recipe, and make sure all of the ingredients are on hand. Ingredients should be loaded into the mixing bowl from dry to wet. In a simple normal white dough recipe the ingredients should be loaded into the mixer as follows:
Firstly flour is to be loaded. An ingredient used in many foods, flour is a fine powder made from cereals or other starchy food sources. It is most commonly made from wheat, rye, barley, and rice, amongst many other grasses and non-grain plants. Flour is the key ingredient of bread, which is the staple food in many countries. Simply Flour is the fine, clean and sound product obtained by the milling of sound, cleaned wheat. Flour shall not contain more than 150g of water. Flour is loaded into the bowl firstly to give the basis of preparing a dough.
Secondly Salt is to be added, Salt in a yeast bread recipe moderates (slows) the action of yeast and allows it to produce carbon dioxide at a reasonable rate, resulting in a finer textured bread with small to medium air cells. This in turn allows for the flavour of the yeast to develop, as well as enhancing it. Omitting or reducing the amount of salt in yeast dough can cause the dough to rise too quickly, adversely affecting the shape and flavour of bread, as well -- breads without salt tend to have paler crusts and a flat, dull taste. Salt also adds structure to the dough by strengthening the gluten, which keeps the carbon dioxide bubbles from expanding too rapidly. Salt is added secondly and must not come into dry contact with yeast, as it will deactivate or kill the yeast. With this in mind all ingredients being loaded into the bowl should not come into contact with each other until mixing begins. I.e. separate ingredients around the bowl when weighing.
Thirdly Improver is to be loaded into the mixer, keeping in mind not to place into contact with salt, which is already loaded into the bowl. The improver within the dough has three main functions, that is to Condition the Gluten, Provide yeast with nitrogen source and Enhancement of diastatic enzyme activity. When this ingredient is loaded the bowl is to spin on slow speed to mix into the flour these ingredients.
After dry mixing Yeast is to be loaded into the dough, Yeast is one of the essential ingredients in bread production. The two main functions of yeast are to produce carbon dioxide gas (co2 gas) and to condition, or ripen, the gluten in the dough. Compressed Yeast is to be crumbled up around the bowl and must not come into direct contact with salt.
Water is next to be added into the recipe, In bread recipes, water stimulates the growth of both the yeast and the development of gluten. It dissolves and activates the yeast; it activates the protein in the wheat flour and blends with it to create sticky and elastic dough.
Finally oil is to be loaded into the dough, this can be done in two ways, one way is to directly place oil into the weighed recipe before the mixer is started. Or the other way is to place the oil into the mixer after the ingredients and flour have formed a dough, but yet to reach the doughs (FDT) final dough temperature. Oil also known as a shortener, help to prevent the formation of excess gluten and increase the keeping qualities of a bread loaf, preventing it from drying out too quickly. Oil also adds flavour and helps to increase the loaf volume. Once the oil is loaded into the bowl, mixing can begin or resume.
Loaded ingredients into the bowl and Mixing are the first steps in the bread making process; it blends the ingredients in the dough and traps air bubbles (gas) inside.
Simply Ingredients should be added,
Flour
Salt
Improver
Yeast
Water
Oil
Identify the slow mixing time for the 3 varieties of dough used in Water temperature activity.
The three doughs being Wholemeal, Country Grain and Cape Seed.
Wholemeal
Wholemeal Recipe
Wholemeal Flour…………..100%
Salt…………………….2%
Improver……………….1%
Gluten…………………..3%
Yeast…………………..3%
Oil………………………1%
Water…………………..70%
EYF………………….1.79
The method begins with determining the flour weight needed to produce the required product, and all ingredients must be weighed in correct proportion.
The mixing details for wholemeal are:
-Add all dry ingredients and yeast
-1 Min dry mixing on slow reverse
-Add water at a temp of 10 degrees and oil
-3 mins mixing on slow reverse
-Mix to required FDT (28 degrees) on fast speed.
-Ensure dough has cleared using window test
-1 min bowl rest before moulding process.
( By mixing a 25kg wholemeal dough using 12 degrees water by personal experience the dough spun for 4mins slow speed-mixing speed, and 4mins fast speed-development speed, then after oil is added 30secs slow speed, 7mins fast speed for the dough to reach 28 degrees).
Country Grain
Country Grain Recipe
Bakers Flour……………….75%
Country Grain Mix………..25%
Salt…………………………….2%
Improver……………………1%
Gluten………………………2%
Vegetable Oil……………..1%
Yeast…………………………..3%
Water…………………………57%
EYF……………………………1.66
The first part to correctly mixing country grain is to ensure that u have the right water temp. 10 degrees Celsius is a good start, but this temp. may need adjusting from time to time. If the weather and your bakery is colder, water temp. may need to be increased, this is reversed in warmer conditions. Because of the nature of this dough, being quite a heavy dough with a lot of body about it, it does take a little longer to mix the grains thoroughly. Patience is vital in importance to get a quality end resulted product.
The mixing details for Country Grain from the recipe book are:
-Add all dry ingredients and yeast
-1 Min dry mixing on slow reverse
-Add water at a temp of 10 degrees and oil
-3 mins mixing on slow reverse
-Mix to required FDT (28 degrees) on fast speed.
-Ensure dough has cleared using window test
-1 min bowl rest before moulding process.
(By mixing a 32kg Country Grain dough using 12 degrees water by personal experience the dough spun for 4mins slow speed-mixing speed, and 4mins fast speed-development speed, then after oil is added 30secs slow speed, 6mins fast speed for the dough to reach 28 degrees).
Cape Seed
Cape Seed Recipe
100% Wholemeal Flour…100%
Sesame Seed…………..20%
Linseed…………………….20%
Sunflower Seeds…………..15%
Poppy Seed………………..10%
Country Grain Mix………….10%
Salt………………………….2%
Improver………………….….1%
Gluten……………………..7%
Malt Powder……………...1%
Yeast……………………….3%
Water………………………110%
EYF…………………….2.99
The Cape seed dough is the one of the most complex dough a baker will mix. The usage of different ingredients results in the longer spinning and mixing times of this product.
The recipe Book states Cape seed mixing procedure is:
-Add all dry ingredients and yeast
-1 Min dry mixing on slow reverse
-Add water at a temp of 10 degrees and oil
-3 mins mixing on slow reverse
-Mix to required FDT (28 degrees) on fast speed.
-Ensure dough has cleared using window test
-1 min bowl rest before moulding process.
(By mixing 3kg Country Grain dough using 12 degrees water by personal experience the dough spun for 4mins slow speed-mixing speed, and 4mins fast speed-development speed, followed by 30 secs slow speed and 15 to 20mins fast speed). Cape seed dough is the longest spinning dough to reach 28 degrees.
Tuesday, August 28, 2007
3/1 Water Temperature
Water Temperature and Finished Dough Temperature
The initial temperature of the water added to your ingredients will affect the finished dough temperature which in turn affects the quality of your final product. In baking to get a quality product the desired aim is to have a developed dough with the correct temperature.
Identify 3 varieties of dough you produce and document the initial water temperature and the finished dough temperature for each.
Wholemeal Dough
It is recommended that a standard bakery room temperature of 20 degrees to 35 degrees should have the water temperature at 10 degrees, in warmer conditions, i.e. in summer; water temperature is reduced to 6 degrees – 8 degrees. In colder conditions the water temperature is increased to 12 degrees. These conditions apply in the water temperatures of the wholemeal dough. It is important to maintain consistency when producing the dough in order to contain optimum dough development. The finished dough temperature (FDT) of the wholemeal dough is 28 degrees Celsius; a window test should be performed to determine dough clarity and elasticity.
This dough will take longer to spin than a normal white dough as it is using bran, germ and endosperm as well as added gluten and so requires longer mixing. In general new longer mixing times will produce better breads than previous methods. This means using cooler water the mixing can continue to achieve the desired temperature of 28 degrees. The measuring of the final tempreture of the dough determines accurately a prediction of the amount of energy impacted on the wholemeal dough.
The water and temperature determine the final outcome of a dough, in means of volume, texture, character, appearance, shelf life and quality. ( By mixing a 25kg wholemeal dough using 12 degrees water by personal experience the dough spun for 4mins slow speed-mixing speed, and 4mins fast speed-development speed, then after oil is added 30secs slow speed, 7mins fast speed for the dough to reach 28 degrees).
Factors contributing to the temperature of a dough are, whether, room temperature, mixer type, dough size, bakery condition, is the bowl temperature and bench temperature.
Country Grain Dough
It is recommended that a standard bakery room temperature of 20 degrees to 35 degrees should have the water temperature at 10 degrees, in warmer conditions, i.e. in summer; water temperature is reduced to 6 degrees – 8 degrees. In colder conditions the water temperature is increased to 12 degrees. These conditions apply in the water temperatures of the Country Grain Dough.
Adding correct water temperatures determine correct dough development; the finished dough temperature (FDT) of a country grain dough is 28 degrees. A window test is performed, which is when the dough is stretched to form a clear membrane, which is free of lumps and rough patches. Correct mixing is very important to ensure quality country grain bread quality. Dough. Correct water temps, 28 degrees (FDT) and window test achieve optimal dough development in a country grain dough.
(By mixing a 32kg Country Grain dough using 12 degrees water by personal experience the dough spun for 4mins slow speed-mixing speed, and 4mins fast speed-development speed, then after oil is added 30secs slow speed, 6mins fast speed for the dough to reach 28 degrees).
Factors why a country grain dough may spin longer than a normal white dough are again the factors mentioned in the final paragraph of wholemeal dough as well as country grain doughs use added grains and gluten, in conjunction with the mixing of white flour into one dough.
Cape Seed Dough
It is recommended that a standard bakery room temperature of 20 degrees to 35 degrees should have the water temperature at 10 degrees, in warmer conditions, i.e. in summer; water temperature is reduced to 6 degrees – 8 degrees. In colder conditions the water temperature is increased to 12 degrees. These conditions apply in the water temperatures of the Cape Seed Dough. Yeast activity is approx. doubled by a 5% rise in temperature and as a rule of thumb changing water temp. By 1 degree will change dough temperature by approx. 0.5degrees.
Correctly determining an ideal water temperature creates and optimal dough development for a cape seed dough. The finished dough temperature (FDT) of a cape seed dough is 28 degrees. Water temperature in doughs determine proof times, and oven spring of doughs later on through the baking cycle.
(By mixing a 3kg Country Grain dough using 12 degrees water by personal experience the dough spun for 4mins slow speed-mixing speed, and 4mins fast speed-development speed, followed by 30 secs slow speed and 15 to 20mins fast speed). A cape seed dough is the longest spinning dough to reach 28 degrees.
Factors contributing to why a cape seed may spin longer than a normal white dough are, whether, room temperature, mixer type, dough size, bakery condition, is the bowl temperature and bench temperature. A cape seed dough is wholemeal flour based, has added gluten, grains, seeds, and mostly because cape seed doughs are usually smaller doughs. Small doughs will have erratic mixing times because sometimes they catch up on the spiral and receive a lot of work quickly and sometimes they fall off the spiral and travel around and around the bowl only slowly recieveing the required work to reach a temp. of 28 degrees.
Question
What will happen to the ingredients if the finished dough temperature is too high?
Mixing has three main purposes:
To combine ingredients into a uniform, smooth dough.
To distribute the yeast evenly throughout the dough.
To develop the gluten.
When ingredients are mixed together along with flour and water, they form a dough, if a finished dough temperature is too high it can have a detrimental effect of the final quality of a product.
In general a dough temperature between 26 º- 28 º Celsius is advisable. A higher dough temperature hardens the gluten and the gluten becomes too tough to process it. A high dough temperature also requires increased processing speed, which is not always possible.
A dough which is overheated results in un-optimal developed dough and poor product, at warm dough temperatures yeast begins to burn out and the ingredients begin to break down due to excessive heat created by over mixing and going beyond a doughs tolerance.
Too high temperatures can rupture the doughs ingredients causing dramatic effects towards a loafs final outcome in means of its volume, shape, Holes within the bread, character, texture, strength, the loafs colour and overall appearance.
Therefore a FDT (Final Dough temp.) of 28 degrees is critical as it allows the yeast to work at its optimum range, as too high temperatures discombobulates the yeast fermentation ability and its overall effect within a loaf, whilst keeping in balance, the rate of change in gluten and starch structures due to enzyme activity.
Factors which contribute to too high of temperature within a dough are, the doughs size, the whether, room temperature, mixer type, dough size, bakery conditions, the bowl temperature and bench temperature and mostly the water temperature, mixing times and speeds of the dough.
Sunday, August 26, 2007
3/1 Weigh Ingredients
Dough 1
800g Blocks-48…………..38.4kg
800g Tin Vienna-6……….4.8kg
800g High Tin-6………….4.8kg
550g Cob-6……………….3.3kg
550g Vienna-10…………..5.5kg
550g Pipe-3………………1.65kg
450g Stick-5……………….2.25kg
400g Tin Vienna-6………..2.4kg
400g Flour-6………………2.4kg
400g Block-6………………2.4kg
Therefore the sum of the kilogram column on the right is 67.9kg, therefore dough 1s total needed weight is 67.9kg. But a 70 kg (5 Flour bags at 12.5kg and 7.5kg of flour) dough will be used to produce the above products.
So therefore the recipe will be…
Dough 1 Recipe
Bakers Flour…100%............70kg
Salt………………….2%................1.40kg
Improver……………1%...............0.70kg
CanolaOil…………..1%.............0.70kg
Yeast……………….2%................1.40kg
Water………………..60%..............42kg
EYF…………………1.66
Total Dough Weight………116.2kg
Dough 2
800g Blocks-48………………..38.4kg
800g Flour-21………………….16.8kg
80g Knot-90……………………7.2kg
80g Hamburger Roll-30………2.4kg
80g Round-90………………….7.2kg
80g Long-60…………………….4.8kg
80g Bap-30………………………2.4kg
40g Table Roll-30……………….1.2kg
40g Dinner-60……………………2.4kg
Therefore the sum of the kilogram column on the right is 82.8kg, therefore the total needed weight is 82.8kg for dough 2. But an 85 kg(6 Bags of flour at 12.5kg and 10kg of flour) dough will be used to produce the above products.
Dough 2 Recipe
Bakers Flour………100%............85kg
Salt………………….2%................1.70kg
Improver……………1%...............0.85kg
CanolaOil…………..1%.............0.85kg
Yeast……………….2%................1.70kg
Water………………..60%..............51kg
EYF…………………1.66
Total Dough Weight………141.1kg
Dough 3
800g Blocks-48………..38.4kg
800g Flour-24…………..19.2kg
800g Tin Vienna-3………2.4kg
800g High Tin-3………….2.4kg
550g Pipe-3………….1.65kg
450g Stick-5………….2.25kg
400g Block-3…………1.2kg
80g Long-60………….4.8kg
40g Table Roll-30…….1.2kg
40g Dinner-30…………1.2kg
Therefore the sum of the kilogram column on the right is 74.7kg. Therefore dough 3 total weight needed is 74.7kg, But a 75 kg (6 flour bags at 12.5kg per bag) dough will be used to produce the above products.
Dough 3 Recipe
Bakers Flour………100%............75kg
Salt………………….2%................1.50kg
Improver……………1%...............0.75kg
Canola Oil…………..1%.............0.75kg
Yeast……………….2%................1.50kg
Water………………..60%..............45kg
EYF…………………1.66
Total Dough Weight………124.5kg
Why it is important to correctly calculate and weigh ingredients?
Since most bread is made up of only four basic ingredients, flour, water, salt and yeast, it is small changes in the way the ingredients are combined that makes one loaf different from the other. Differences in flavour can come from varying fermentation times, ingredient weights and flour combinations. Differences in appearance can come from shaping, baking, and variations of water levels and ingredient percentages and calculations.
Each ingredient in a formula, including the liquids, is measured by weight. By using weight, the amounts of various ingredients can be directly compared to each other. The reason it is important to weigh flour is that the texture of various flours and the degree to which they are compacted affect how much or how little space they may take up. Weighing flour leaves less room for error when weighing the other ingredients. Flour is the main ingredient in the baker’s percentage, and as such is considered 100% of the recipe, from the percentage of flour a baker can determine the correct calculations and weight of the other ingredients to be added into the recipe to create a perfect dough.
Correctly calculating flour weight allows a baker to resize a recipe easily in accordance with other ingredients. This determines how much salt, improver; yeast etc. needs to be mixed into the dough, by doing so this helps to balance a dough and also falls into accordance of getting a correct yield. Also taking into account the desired amount of water needed to be mixed within the dough, thus creating absorption of water into the flour. For example, water is necessary for making bread, too much water causes a dough to be slack, and too less water causes a dough to be tight.
In conclusion simply it’s important to calculate and weigh doughs correctly because if one thing is calculated or weighed incorrectly it will affect the dough in mixing and through the moulding and proofing stages of development, all the way to when the product is baked, therefore the final product will not be standard.
Reasons why it is important to Calculate and Weigh Ingredients……
- To reduce the amount of wastage
- Correct dough development
- To get correct Yeild
- To gain correct water levels for absorption of ingredients
- Correct calculations inaccordance with other ingredients
- To not upset the doughs balance
- To much or too little of ingredients will have an adversed affect on the final outcome
- Can have a detrimental effect on the loaf, i.e fermentaion time and baking times
- The final products aroma, softness, colour, volume, flavour, smell, oven spring, crust character, shape and texture are influenced by the ingredients.
Subscribe to:
Posts (Atom)